Setup and Display AI Virtual Assistant (AVA) - New UI
Learn how to set up your AVA and build their knowledge around your products!
Build your AVA and Upload Products
Note: You are viewing instructions for the New UI of the AI Virtual Assistant (AVA).
If you are still on the older version, please see: Setup and Display AI Virtual Assistant (AVA) .
Follow these steps to create and set up your AI Video Assistant (AVA), connect it with your products, and upload resources to build a powerful knowledge base.
Step 1: Create Your AI Video Assistant (AVA)
Step 3: Upload Product Resources
Step 7: Add Business Info Resources
Step 1: Create Your AI Video Assistant (AVA)
- Select AI Video Assistant from the toolbar in the Business Portal.
- Click on Create New Assistant and select the assistant profile for your product and click Add Expertise.

- Proceed to personalize your assistant by entering a distinctive name and providing a detailed description.

- Select your store and specify the products you want AVA to support. All products and updates will automatically sync with your assistant.
- Choose the default way shoppers will initiate their conversations with AVA. You can set the starting preference to either text (chat mode) or audio (talk mode). Shoppers are free to switch between these input options at any point in the dialogue.
- You also have the option to upload a custom image, replacing the default avatar and giving your assistant a uniquely personalized appearance. Click "Create" to confirm your selection.

Step 2: Add Products
1. Open the Product tab (next to Assistant).
2. Select the Store you want to add products from.
3. Click Add Product.
4. Choose the products and click Add.
5. To add more products, click + Add Products.
6. To delete products, click Manage, select the items, and click Delete.

Step 3: Upload Product Resources
1. Select a product.
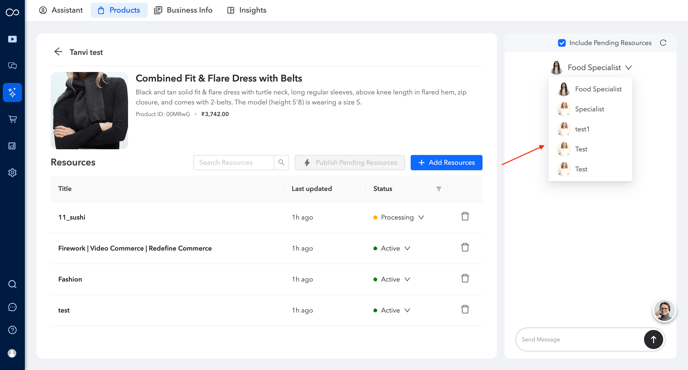
2. Click + Add Resources.
3. Upload files by dragging and dropping or selecting them from your device.
4. Manage uploaded resources in the Product Resources page.
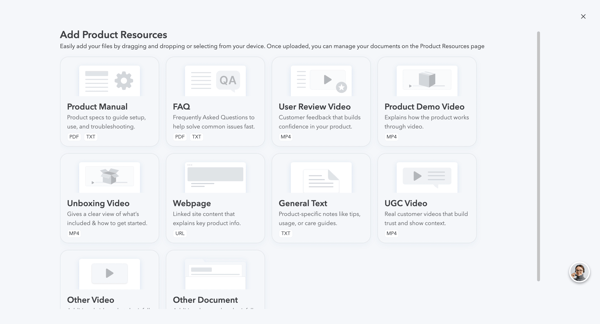
Resource Types You Can Add
You can upload resources directly to each product and easily duplicate those resources across multiple products as needed.

Product Manual - Provide detailed setup instructions, usage guides, and troubleshooting steps.
-
Formats: PDF, TXT
-
Upload a file or enter text directly.
FAQ - Include answers to common questions and solutions for frequently encountered issues.
-
Formats: PDF, TXT
User Review Video - Add customer testimonial videos to build buyer confidence.
-
Formats: MP4 (up to 300MB), MOV, WMV, FLV, AVI, PNG, JPG, JPEG
-
Options:
-
Upload new content or select from your library
-
Import short videos from your channel (previous interactions will not transfer)
-
Customize the video title
-
Choose to keep original audio or let AVA narrate
-
-
Action: Click Add Video to save
Product Demo Video - Showcase how your product works with a clear visual demonstration.
-
Format: MP4
Unboxing Video - Highlight what’s inside the box and provide first-use instructions.
-
Format: MP4
Webpage - Add direct links to informative product pages on your website.
-
Format: URL
General Text -Share product notes, tips, and best practices.
-
Format: TXT
UGC (User-Generated Content) Video - Incorporate authentic customer videos to provide credibility and context.
-
Format: MP4
Other Video -Upload any additional video resources that don’t fit into the categories above.
-
Format: MP4
Other Document - Attach technical specifications or other supporting files.
-
Format: PDF
Resource Management
- To search for a specific resource, use the search function. Select "Publish Pending Resources" to activate and publish any resources that are ready but not yet live.

- Filter your resources by status using the filter icon—choose between pending, active, or disabled—to easily manage your resource visibility and workflow.

- To preview any knowledge base entry, simply click on the resource to open its preview page. From here, you can also update the resource status and click "Save" to confirm your changes.

- Seamlessly test Ava directly on each product page as you update resources—no need to close or switch pages—making the workflow significantly more efficient.

Step 4: Embed AVA
You can integrate your AVA into your website from this section, which will enhance user engagement and improve customer support. Learn how to Embed Ava onto your website - link
Step 5: Manage Conversations
You will be able to access and review all the conversation history to gain valuable insights and enhance the quality of user interactions. You also have an option to export the conversations.
For more detailed information, please refer to the guide on conversation history. - link
Step 6: Configure Settings
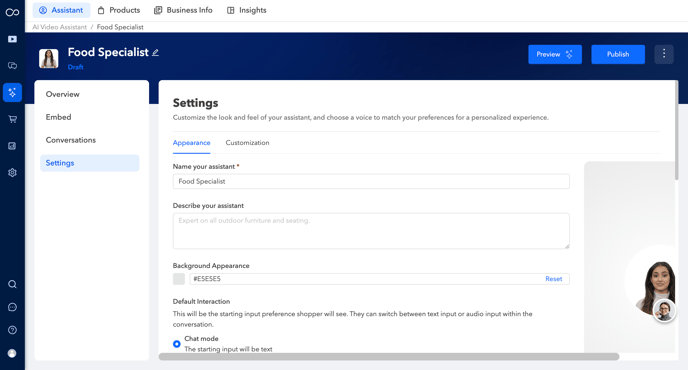
Appearance

- Personalize your assistant’s appearance and voice to align with your brand’s identity. Update the assistant’s name and description to reflect its role and character.
- Choose a solid background colour for the assistant.
- You can set the default interaction mode for shoppers, choosing whether they begin with text or audio input. Shoppers can easily switch between modes during their conversation.
- You can also update your assistant's profile to reflect new roles, expertise, or branding as needed.
- Upload Assistant's Image: This image will serve as a replacement for the default avatar in the user interface, allowing you to personalize the appearance of your assistant. The image you choose with be avatar of your assistant.
-
Click on Save once done.CustomizationCustomize your assistant’s greetings, including a welcome message and a returning visitor message. Choose a personality profile—such as Friendly & Helpful, Minimalist & Direct, Inquisitive & Curious, Professional & Formal, or Empathetic & Supportive—to match your brand’s tone. Click Save when finished.
Step 7: Add Business Info Resources
To add Business Info resources, go to the Business Info tab and click + Add Resources. You can include brand-wide details such as return policies (TXT, URL), shipping info (TXT, PDF), checkout and payments (TXT, URL), store FAQs (TXT, URL), contact support (TXT, URL), terms and conditions (TXT, URL), custom uploads (PDF), and webpages (URL). This section contains all resources that are not linked to any specific product. You can view the content type of each resource added here.

Each resource upload card opens its corresponding upload method screen.

Step 8: Preview and Publish
Preview your AVA by clicking the Preview option on the right side of the page. When you're ready to launch, click Publish to make your AVA live for users. Access the options menu (three dots) to change the avatar or delete your assistant as needed.